The best way to ensure transparent grading for your students, and to simplify your end of semester grading in advance, is to set up your Grade Center in Blackboard at the start of the semester.
Getting started:
Your syllabus likely already explains the breakdown for your grading schema. For example, you might be giving a few quizzes throughout the semester which account for 20% of the students’ grade. Keep this schema handy when setting up your grading.
In your Full Grade Center, there are columns which are auto-populated every time you create an assessment (test/quiz and/or assignment).
Please note: An assessment only shows up in the grade center if you have assigned it a number of points and checked the box that says Include in Grade Center grading calculations. This is available when you are creating an assessment. Just scroll down past the description under Grading- Display of Grades. By default this should be enabled, but if you are working with a course copy it may have been turned off by a previous professor. If an assessment does not show up in your Grade Center (but you want it to), you will have to navigate to the assessment and turn this feature on.
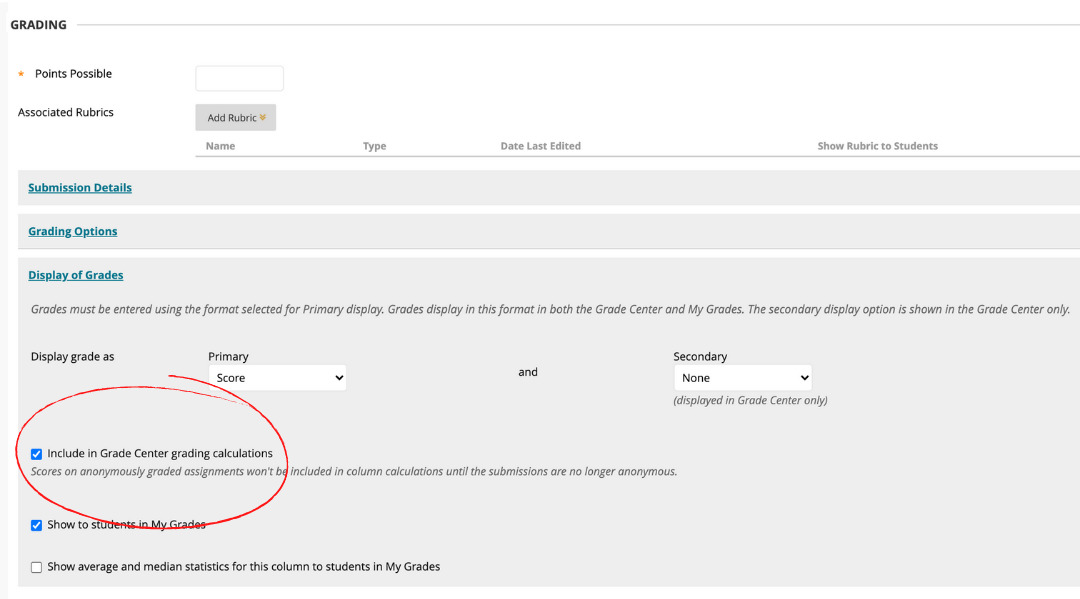
Additionally, in this section you can choose whether or not you show this grade to students.
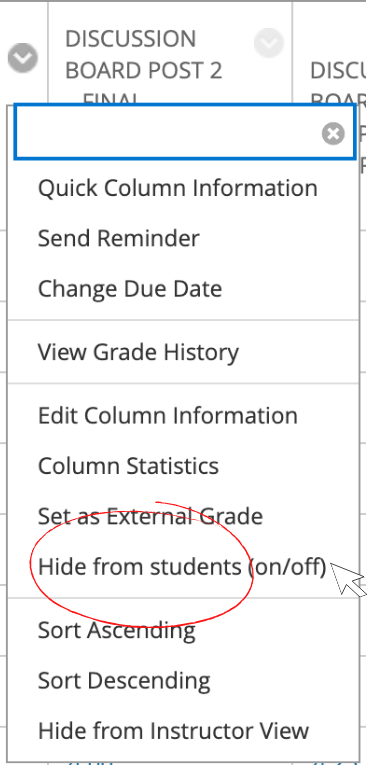
You are welcome to hide columns or categories from students in the full grade center by selecting the down arrow next to the column name, and selecting Hide from students on/off.
|
You will know if a column is hidden because a black circle with a line through it will appear before the name of that column. |
 |
Important note: Any new columns you create are automatically added to the very end, all the way to the right. You may have to scroll to the right to see all of your columns.
To set up your Grade Center to match your grading schema, you’ll have to first create your columns. Then, you’ll set up the final grade calculation under the pre-populated Total column.
Step 1: Setting up your columns
If you have a single item that will account for an entire portion of your final grade (such as a final exam worth 20% of the grade), you do NOT need to create a calculated column for this. Calculated columns are only for multiple columns that need calculation.
If a column is based on participation or something else that is not graded directly within blackboard, you would create a new column and manually enter in the grades for each students. Then, you would move on to step 2.
Once you see all the assessments you are looking to include in your final grade in your grade center, you can create calculated columns to automatically tabulate the sum or average of these assessments for you. Just select Create Calculated Column at the top of the grade center. Then select the option that is most appropriate for your grading schema.
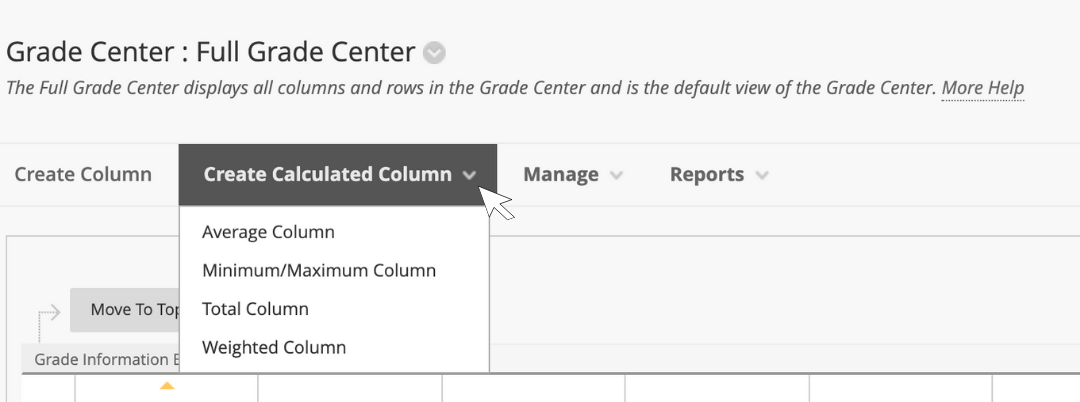
The most commonly selected options are Average Sum or Total Sum. For example: if you want 4 quizzes to be worth 25 points each and then factor that grade into the total percentage as 20% of the grade, select Average Sum. However, if you have made each of those 4 quizzes worth 5 points each towards the final grade of 100, you would select Total Sum.
The next page allows you to add a column name and description. You can also select how that calculated grade shows up to your students under Primary and Secondary Display. Score will tell you how many points each student has as a full sum of all their discussions, and Percentage is also nice to have for later calculations as a percentage out of 100.
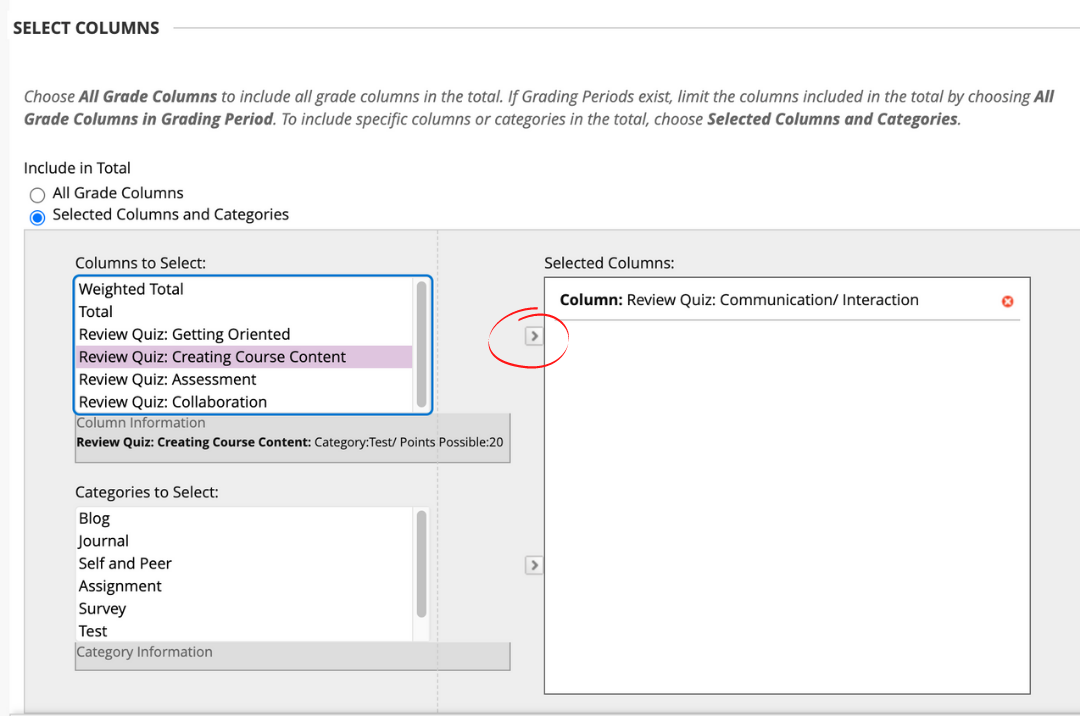
Scroll down further on this same page to Select Columns, and under Include in Total, click Selected Columns and Categories. This is where you can select individual columns and move them to the right to include them in this calculation. You can also select pre-populated Categories if you wish, to include that along with specific columns.
After selecting an item on the left, click the right arrow to add it to Selected Columns on the right. Hint: You can select more than one at a time by holding down Shift on your keyboard.
Once you’ve added all your assessments, scroll down to Calculate as Running Total. I suggest selecting NO because this option factors in any assignments that are not yet graded, and shows it to students as zeros.
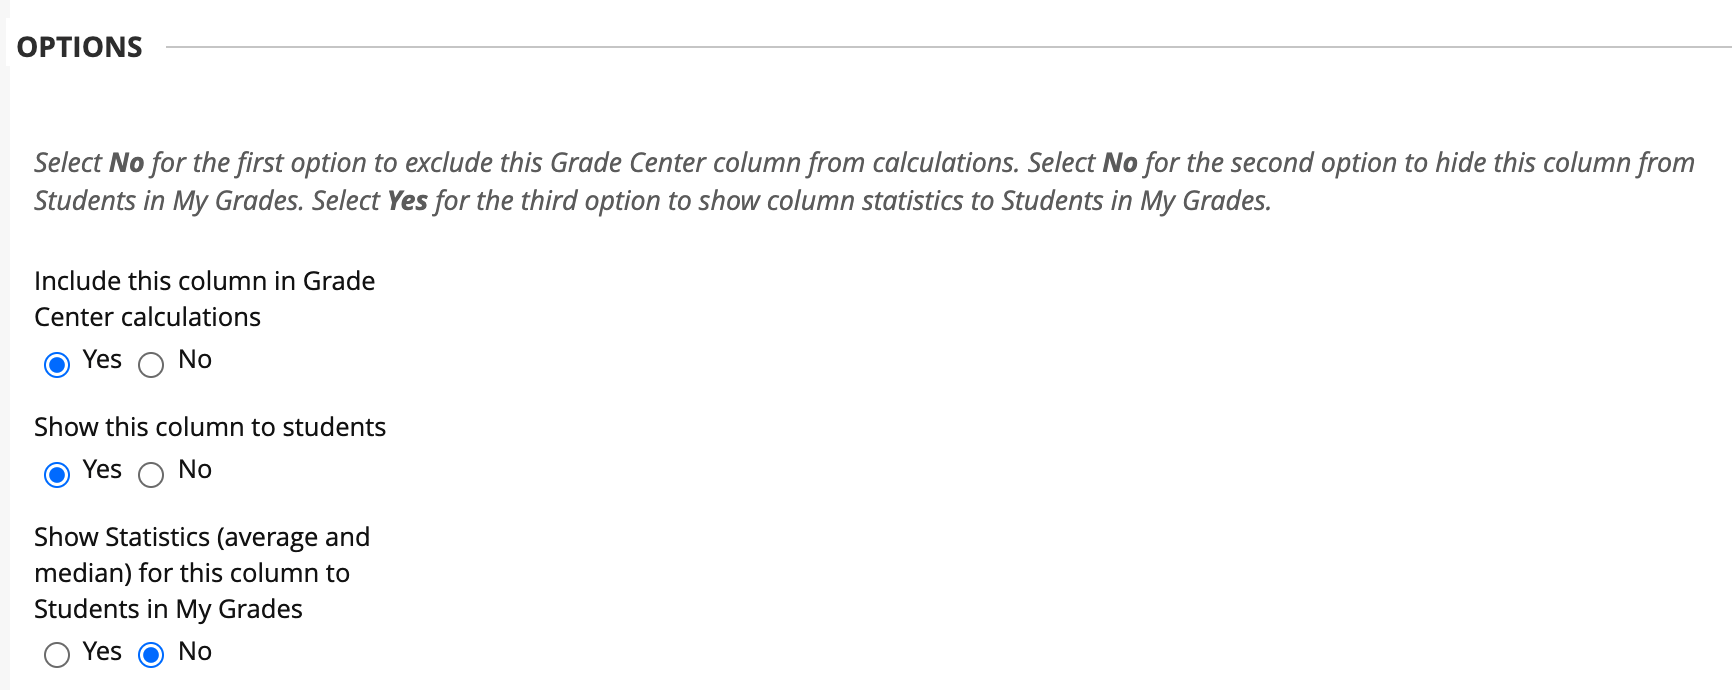
Scrolling down further, under Options, you’ll see that you have the choice of hiding this calculated column from students. Some professors hide these columns up until the end of the semester to avoid any confusion.
|
Next, scroll down to the bottom right and select Submit once you’ve finished setting up this calculated column. You’ll have a chance to assign it a value in Step 2. |

|
On the next page you should see a Success message indicating that you created the column. You’ll find that new column at the far right- you may need to scroll to the right using the scroll bar at the bottom of the page, if it’s not visible.
Set up as many calculated columns as you need before moving on to step 2.
Step 2: Setting up a final grade calculation
The Grade Center automatically creates the Weighted Total and Total columns. To follow your grading schema where certain categories equal a certain percentage of the grade, you’ll want to use the Weighted Total column.
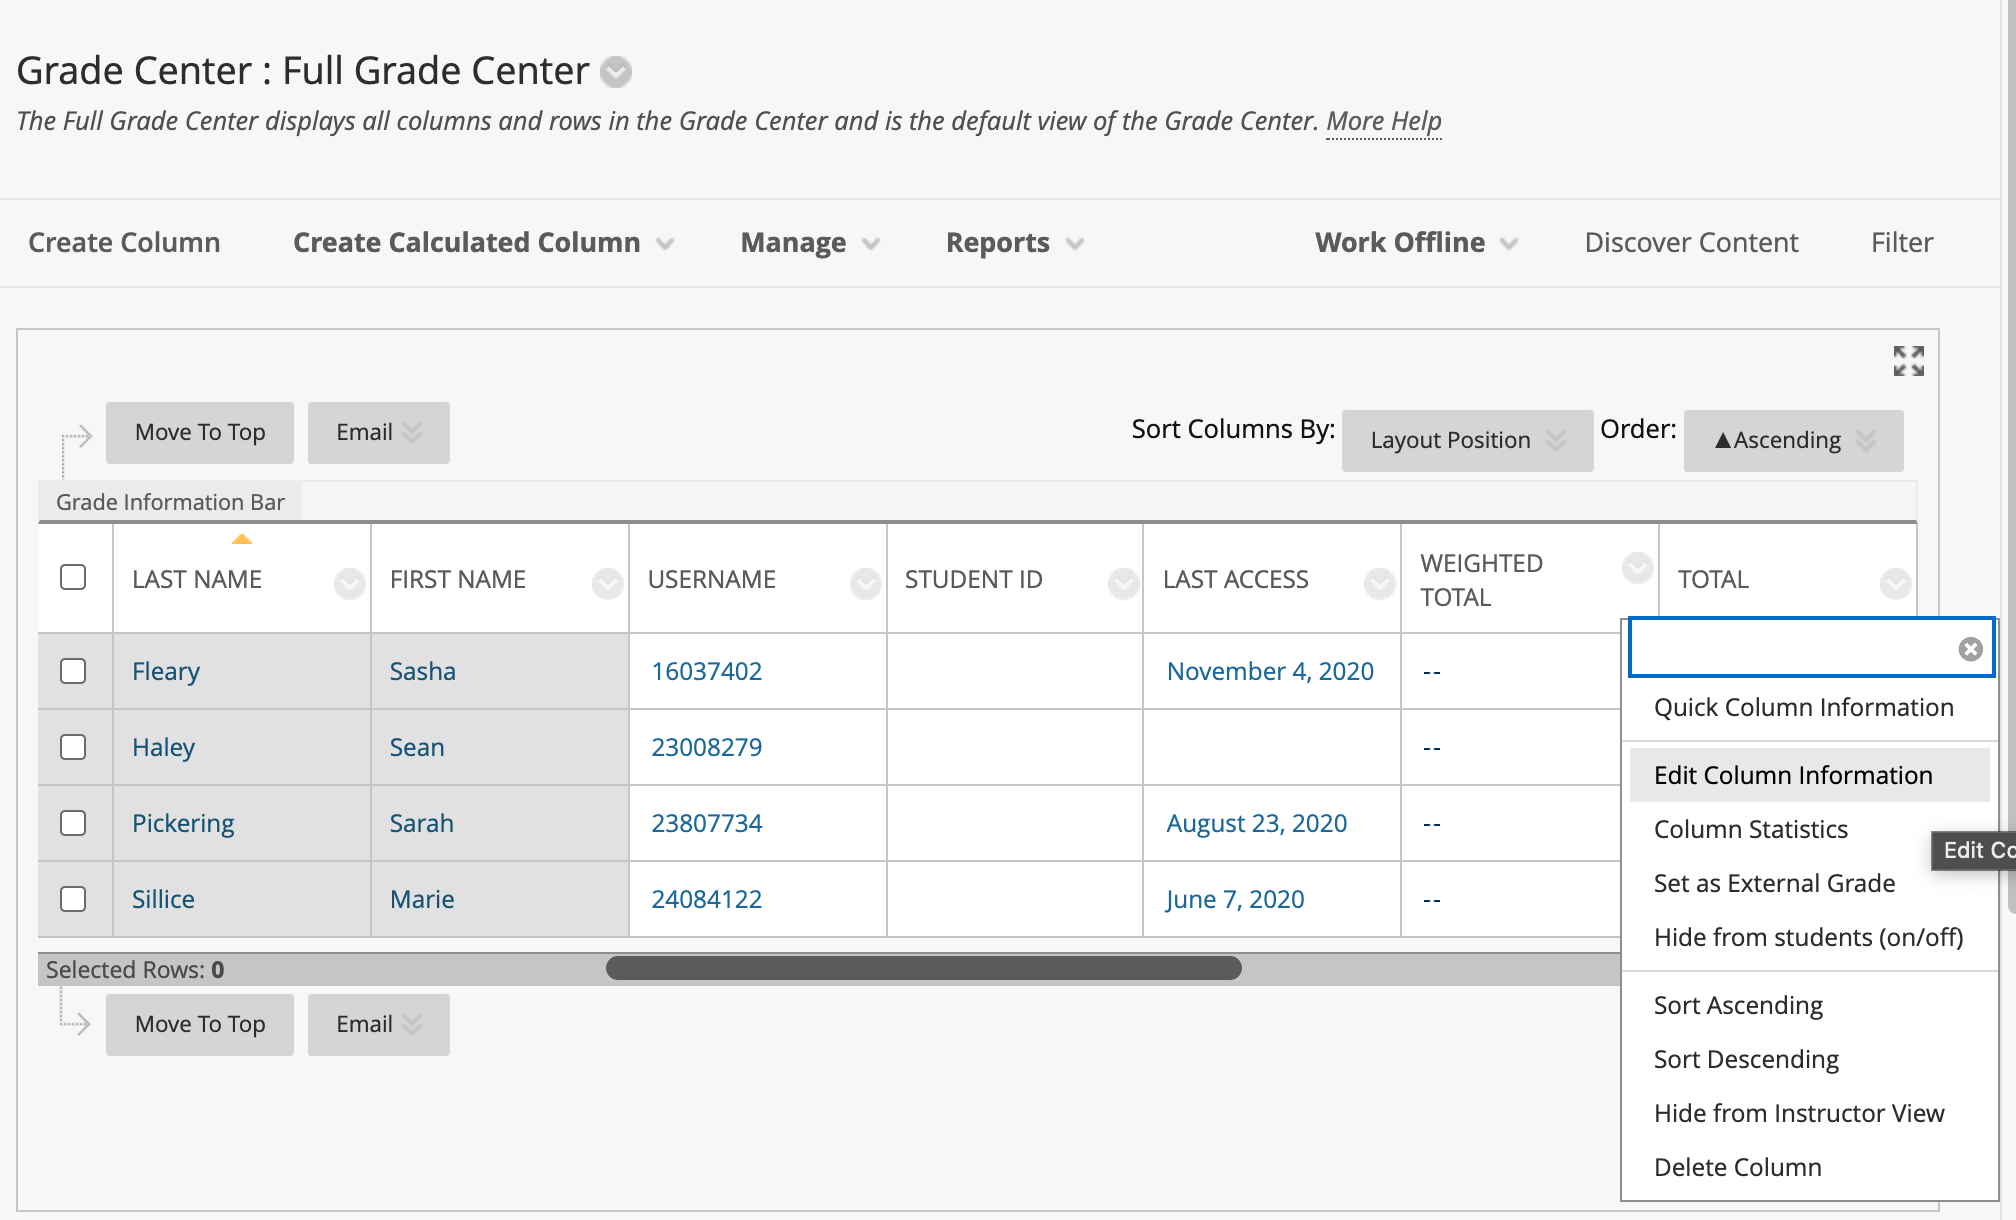
Select the down arrow to the right of Weighted Total, and select Edit Column Information.
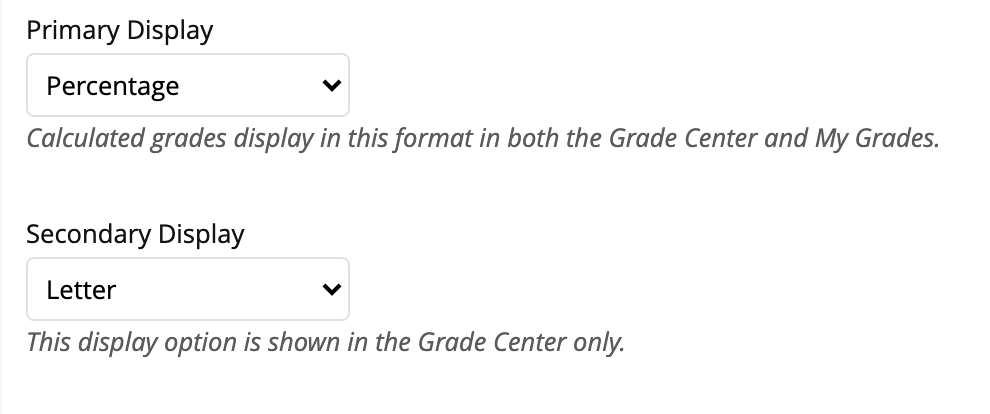
 On this page after you scroll down a bit you’ll see the Primary and Secondary Display options. I suggest setting these to Percentage, and Letter.
The percentage is handy for student view. When you submit your final grades to CUNY First, the letter grade will be helpful for you to have.
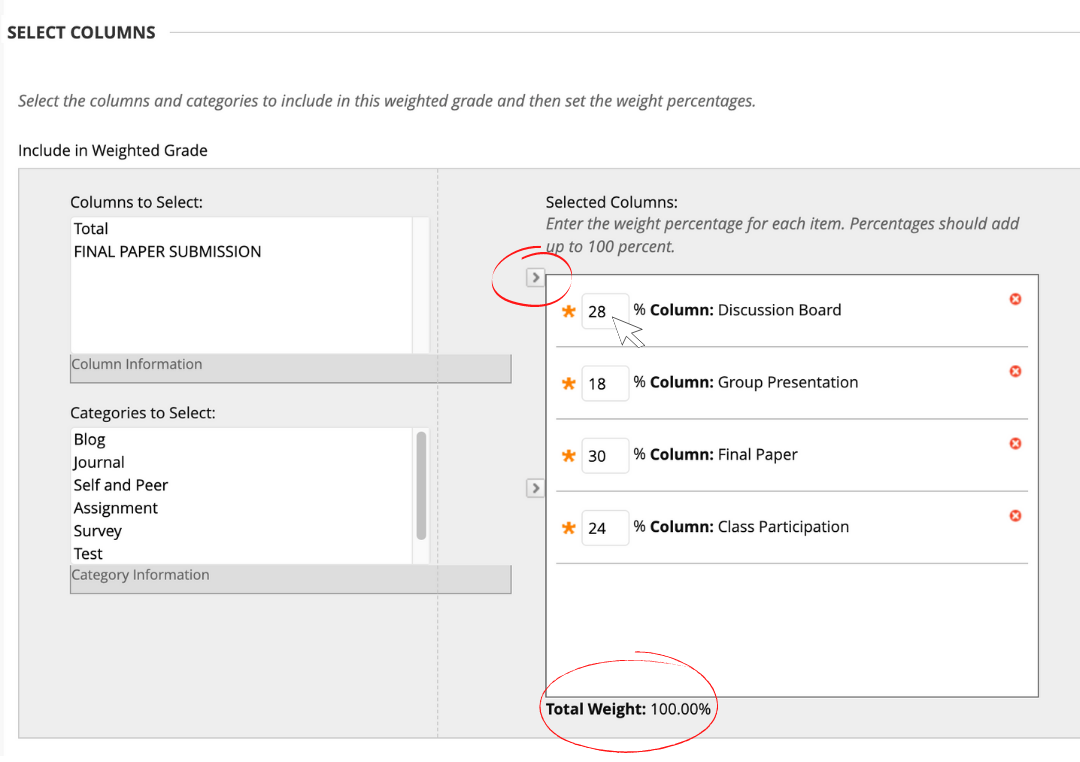
Under Select Columns– Include in Weighted Grade, you’ll select the items you wish to calculate on the left, and use the arrow in the center to move it to the right hand side. Once you have these selected columns, enter a number for each column, to total 100.
Scroll down. Just like when creating a calculated column, you may wish to hide this from students, or to calculate a running total. These options are yours to make. When done, select Submit on the bottom right to save your changes.
Now you’re set up for grading! Just keep an eye on assignments as they come in (under Grade Center- Needs Grading), and you’ll have an easy time at the end of the semester when it’s time to submit your final grades on CUNY First.
Please note: Grading discussion boards is a little bit more tricky. Download this discussion board grading user guide for details. Or you can use our tutorial for more information.
For a more detailed explanation of setting up your discussion board, download this discussion board grading user guide.
If you have any questions or need assistance, feel free to reach out.
Find more resources and tips for faculty from the Office of Online Learning, including multimedia and other tutorials.


